1. UTKATASANA
Utkata means powerful, fierce, and uneven. This asana is like sitting on an imaginary
chair.
TECHNIQUE:
1. Stand Erect.
2. Do not bear the weight of the body either on the heels or on the toes, but distribute it
evenly on both.
 3. Keep the legs at one foot gap. The both legs must be parallel like railway rails.
4. Stretch your hands at front side.
5. The both hands should be at shoulder level and the distance between the two hands is
equal to the length of the chest.
6. Bend the knees and lower the trunk till the thighs are parallel to the floor.
7. Do not bend forward, but keep the chest back as far as possible.
8. The back bone i.e., the spinal cord should be straight.
Breathing:
Breathing should be normal in the final position. Should not hold the breath. After
relaxing this asana, two times deep breathing can be taken.
Timings:
This asana can be done for 20 to 30 seconds according to the practitioner’s capacity. 1 or
2 times can be done.
Benefits:
The ankles become strong and the leg muscles develop evenly. The abdominal organs
and the back are toned. This pose removes stiffness in the shoulders and corrects any minor
deformities in the legs.
This asana cures the knee pain and the swelling in the knees and the foot.
This asana gives the 5 km walking effect. So we need not go for walking.
2. PADMASANA
Padma means Lotus. When the Asana is demonstrated, it resembles the appearance of a
lotus. Hence the name padmasana.
TECHNIQUE:
1. Sit on the ground by spreading the legs forward.
2. Then place the right foot on the left thigh and the left foot on the right thigh.
3. The both heels should touch the stomach near the navel.
 4. Place the left hand over the left knee and then place the right hand over the right the knee.
5. The palm should face upwards and the index finger should touch the thumb.(Chin Mudra)
6. From the base to the neck the spine should remain erect.
7. Keep the eyes closed and relax the mind.
Timings:
Keep the position as long as you can do it with comfortable.
Breathing:
Breathing should be normal in the final position.
Benefits:
This is the best asana for practicing Pranayama, Japa and Dhyana. Purifies and tones
Coccyx and sacral bones through larger blood supply to pelvic region. Since the blood is made
to circulate in the lumbar region and the abdomen, the spine and the abdominal organs are
toned.
Note:
People who seldom sit on the floor will not have flexible knees. In the beginning they
will feel excruciating pain around the knees. By perseverance and continued practice the pain
will gradually subside and they can then stay in the pose comfortably for a longer time.
Changing the legs position by placing the left foot over the right thigh and the right foot
over the left thigh will helps the legs evenly.
3. YOGA MUDRASANA
The mudras are special are special techniques which consists of the practice of asanas,
breath regulation, contraction exercises, and concentration to attain full control over the senses
 and perception.
TECHNIQUE:
1. Sit in Padmasana.
2. Hold the left hand by the right hand at the back side.
3. Slowly bend forward and try to touch the ground with the forehead.
4. Press the chin against the chest.
Breathing:
Breathing should be normal. After relaxing this asana take two or three deep breathing.
Timings:
This asana can be done for 10 to 20 seconds according to the practitioner’s capacity. This
asana can be done a couple of times.
Benefits:
1. This asana removes all kinds of disorders in the abdomen.
2. This asana intensifies the peristaltic activity and pushes down the accumulated waste
matter in the colon and thereby relieves constipation and increases digestive power
3. Removes the Nostril Blockage and strengthens the lumbo sacral bones.
4. Cures the liver disorders.
5. Yoga mudra helps to awaken the kundalini.
4. UTHITHA PADMASANA
In sanskrit uthitha means “Raised”. This asana is the raised position of padmasana. Hence
the name.
TECHNIQUE:
1. Sit in Padmasana
2. Keep your palms on the floor by your sides.
 3. Then slowly raise the body.
4. There should be no jerking.
5. The body should not be trembling.
Breathing:
Breathing should be normal in the final position. In the initial stage the practitioner may
automatically hold the breath without their knowledge. After relaxing this asana two times
deep breathing can be taken.
Timings:
This asana can be done for 10 to 20 seconds according to the practitioner’s capacity and
their hand’s strength. Do this asana for a couple of times.
Benefits:
1. This asana strengthens the wrists, hands and abdominal walls.
2. Improve the digestion power and eliminates the gas trouble.
3. Reduces the belly.
5. JANU SHIRSHASANA
“Janu” means the knee and “Sirsa” means the head. In this Asana the head is touching the
knees. Hence the name.
TECHNIQUE:
1. Sit down with your legs stretched in forwards.

testis) with your left heel.
3. Keep the right leg stretched at full length. Keep it quiet straight.
4. Catch hold of the right foot with index and middle finger of both hands.
5. Draw the belly inward.
6. Slowly bend down. The forehead should touch the right knee.
7. The elbows should touch the floor.
Breathing:
Breathing should be normal in the final position. Should not hold the breath. After
relaxing this asana two times deep breathing can be taken.
Timings:
This asana can be done for 10 to 20 seconds according to the practitioner’s capacity and
their hand’s strength. Do this asana 2 or 3 times on each side.
Benefits:
1. It is often for women to tone up the muscles of the uterus, the fallopian tubes and
to improve the functions of the ovaries.
2. This asana increases the digestive fire and helps digestion. It stimulates the solar
plexus, Surya chakra and helps to maintain Brahmancharya. All urinary troubles
will be cured will be cured. It is very useful for the intestinal colic and removes all
nostril blockages. Laziness and weakness will also vanish.
6. PASCHIMOTTANASANA
“Paschima” Literally means the west. It implies the back of the whole body from the head
to the heels. The anterior or eastern aspect is the front of the body from the face down to the
toes. The crown of the head is the upper or northern aspect while the soles and heels of the
feet form the lower or southern aspect of the body.
In this asana, the back of the whole boy is intensely stretched, hence the name.

1. Sit on the floor and stretch both the legs stiff like a stick.
2. Catch the toes with the thumb, index and middle fingers.
3. While catching, you should bend the trunk forward. Draw the belly inward.
4. Slowly bend forward and the forehead should touch the knee.
5. Bend the head between the hands. The elbows should touch the floor.
6. Both the legs should be straight. Do not bend the knees.
Breathing:
Breathing should be normal in the final position. Should not hold the breath. After
 relaxing this asana two times breathing can be taken.
Timings:
This asana can be done for 10 to 20 seconds according to the practitioner’s capacity. 2 or
3 times can be done.
Benefits:
1. It reduces fat in the abdomen.
2. This asana makes the breath flow through the Brahma Nadi, Sushumna and rouses the
gastric fire.
3. This asana stimulates the kidneys,liver,pancreas etc,
4. This asana relieves constipation, removes sluggishness of liver, Dyspepsia, belching
and gastritis.
5. Lumbago or stiff back and all sort of myalgia and the other diseases of the back
muscle are cured.
6. It increases peristalsis of the bowels.
7. This asana cures piles and diabetes.
8. The hip muscles of the abdomen, the solar plexus of nerves, and the spigastric plexus
of nerves, bladder prostate, lumbar nerves, and sympathetic cord are all toned up and
kept in a healthy sound condition.
7. UTHANA PADHASANA
“Uthana” means “Raised” “Padha” means “Foot”. This is the raised position of the foot.
Hence the name.
TECHNIQUE:
1. Lie down. Keep the both legs together.

3. Close the fingers. Both the feet should be pointed outwards.
4. Raise the two legs together about half foot (6 inches) from the ground without
bending the legs and the knees.
Breathing:
Breathing should be normal in the final position. In the initial stage the practitioner may
automatically hold the breath without their knowledge. After relaxing this asana two times
deep breathing can be taken.
Timings:
This asana can be done for 10 to 20 seconds according to the practitioner’s capacity. 2 or
3 times can be done.
Benefits:
This asana tones up the lower abdominal muscles. It reduces the belly. Strengthen the
abdominal muscles. Removes constipation, gastric troubles. Cures Hernia (Hernia is due to
the weak spot in the lower abdominal muscles).
8. NAVASANA
“Nava” means ship, boat or vessel. This posture resembles the shape of a boat, hence the
name.
TECHNIQUE:
1. Lie down flat. Keep the hands by the side.
2. Simultaneously raise the trunk and the legs from the floor.

4. The balance of the body rest on the buttocks and no part of the spine should be
allowed to touch the floor.
5. Keep both hands either side of the knees.
6. The eyes and the toes should be in the same straight line.
Breathing:
Do not hold the breath during the asana, through the tendency after inhalation. If the
breath is held the effect will be felt on the stomach muscles and not on the abdominal
organs. After relaxing this asana two times deep breathing can be taken.
Timings:
Hold this pose for 10 to 20 seconds. A couple of times can be done.
Benefits:
This asana is effective on the intestines, liver, gall bladder and spleen. It strengthens the
lower back. This asana will help the women because they need strong back for child –
bearing.
Displacement of the navel region can be cured by this Asana.
9. VIPAREETA KARANI MUDRA
In Sanskrit, “vipareeta means “inverted” and karani means “action”. Normally the sun
dwells at the root of the navel region and moon at the root of the palate region. The method
by which is called vipareeta karani mudra.
 TECHNIQUE:
1. Lie down on the ground.
2. Raise the legs slowly so that they remain at right angles to the body.
3. Keep the legs erect and raise the hips making a curvature of the spine. In this process
support the body at the hip bones.
4. Rest the elbows on the ground.
5. Relax the leg muscles.
6. The eyes and the toes should be in the same straight line.
Breathing:
Breathing should be normal in the final position. Should not hold the breath.
Timings:
This asana can be done for 2 to 3 minutes according to the practitioner’s capacity. Only
one time is enough.
Benefits:
1. By practicing this Asana wrinkles on the face and grey hairs will disappear.
2. Pituitary and pineal body gets more blood supply. Improves memory power.
Improves digestive power. Eliminates constipation.
10. SARVANGASANA
“Sarva” means all, whose, entire, complete, “Anga” means limb or body. Sarvanga
means the entire body or all the limbs. In this asana the whole body benefits from the
exercise, hence the name. It is also called as “King of Asanas”
TECHNIQUE:
1. Lie on the back quiet flat.
 2. Slowly raise both the legs.
3. Lift the trunk, hips and legs quite vertically.
4. Support the back with the two hands, one on each side.
5. Rest the elbows on the ground.
6. Press the chin against the chest and form a chin-lock firmly.
7. Allow the back, shoulder portion and neck to touch the ground closely.
8. Do not allow the body to shake or move to and fro.
9. Keep the legs straight. When the asana is over, bring the legs down very slowly with
elegance and not with any jerks.
10. In this asana, the whole weight of the body is thrown on the shoulders.
Breathing:
Breathing should be normal in the final position. After relaxing this asana deep breathing
can be taken.
Timings:
This asana can be done for 2 to 3 minutes. This asana can be done twice in the morning
and evening.
Benefits:
1. In this Asana, the thyroid gland is nourished properly which plays a prominent role in
the metabolism, nutrition and structure. Healthy thyroid means healthy function of the
circulatory, respiratory, alimentary, gentio – urinary and nervous systems of the body. This
thyroid operates in conjugation with other ductless glands, pituitary, pineal in the brain, supra
renal above the kidneys, liver, spleen and testes. If the thyroid is diseased, all the other glands
suffer. This asana keeps a healthy functioning of all the organs of the body.
2. It is useful in gonorrhea and diseases of bladder and ovaries. It removes and other
diseases of bladder and ovaries. It removes sterility and diseases of wombs. It removes
dyspepsia, constipation and other gastro – intestinal disorders of a chronic nature. This also
helps to relieve epilepsy, low vitality, anemia, asthma, bronchitis and Blood pressure.
11. HALASANA
Hala means a plough, the shape of which this posture resembles, hence the name.
TECHNIQUE:
1. Lie flat on your back.
2. Keep the hands at the sides on the ground with the palm facing the ground.
3. Keep both the legs together and the legs should be straight.
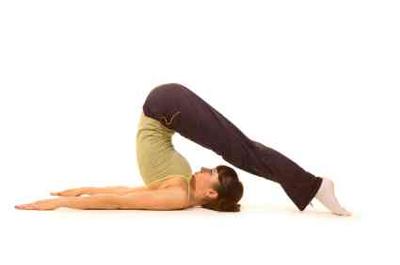
5. Do not raise the hands and should not bend the trunk.
6. Make an obtuse angle. Then slowly, lower the legs.
7. Fold the legs over the body until the toes touch the ground.
8. Keep the knees quite straight and close together.
9. The legs, thighs must be in one straight line.
10. Press the chin against the chest.
Breathing:
Breathing should be normal in the final position. After relaxing this asana breathe slowly
and deeply.
Timings:
This asana can be done for 20 to 30 seconds. 2 or 3 times can be done according to the
practitioner’s capacity.
Benefits:
1. This asana tones the spinal nerves, the muscle of the back, the vertebral bones and the
sympathetic nervous system that runs along the vertebral column on both sides. Obesity and
habitual or chronic constipation, gulma, congestion and enlargements of the liver and spleen
are cured by this Asana. It removes nostril blockage.
2. Halsana prevents the early ossification of the vertebral bones. Various sorts of myalgia
(muscular rheumatism) lumbago, sprain and neuralgia, are cured by this Asana.
12. MATSYASANA
Matsya means a fish. As this asana will help one to float on water easily, hence it is
called fish – pose.
TECHNIQUE:
1. Sit in padmasana.
2. Lie flat on the back with the legs on the floor.

4. Take the head back and rest the crown on the floor.
5. Drag the head further back by holding the crossed legs with the hands and increase the
back arch.
6. Now keep the hands on the legs, and catch the toes with the hands.
Breathing:
In the final position 5 times deep breathing through both the nostrils can be taken. Do not
hold the breath.
Timings:
One time is enough. Two or three times can be done for the asthma patients.
Benefits:
The larynx or wind – box and trachea (wind pipe) are thrown open widely. This asana
removes constipation. It brings down the accumulated faecal matter to the rectum. On account
of deep breathing, it is useful in asthma, chronic bronchitis, etc., the cervical and upper dorsal
nerves are nourished with a good quality of blood and toned properly. The endocrine glands,
viz., pituitary and pineal that are located in the brain are stimulated and toned also.
Note:
Fatty persons with thick calves who find it difficult to have padmasana may simply sit in
the ordinary way and then practice this asana. Practice the padmasana first. Make it firm, easy
and steady. Then take to matsyasana.
When the practitioner finished the asana, head should be released with the help of the
hands and get up.
This asana must be done after vibareeta, sarvanga and hala asanas to obtain excellent
therapeutic results.
13. BHUJANGASANA
In Sanskrit “Bhujanga” means a cobra. When this pose is exhibited, the raised head and
trunk resemble the raised head of a cobra. Hence this is called as Bhujangasana
TECHNIQUE:
1. Lie on the floor face downwards.
 2. Extend the legs, keeping the together.
3. Keep the knees tight and the toes pointing.
4. Place the palm on the ground just below the shoulders.
5. Let the body from the navel downwards to the toes touch the ground.
6. Raise the head and upper portion of the body slowly just as the cobra raised its head.
7. Bend the spine backwards.
8. The muscles of the back and lumbar regions are well stretched.
9. The intra – abdominal pressure is also increases.
10. When the asana is finished, slowly bring down the head to its original position.
Breathing:
Breathing should be normal in the final position. Should not hold the breath. After
relaxing this asana deep breathing can be taken.
Timings:
This asana can be done for 15 to 20 seconds according to the practitioner’s capacity. 2 or
3 times can be done.
Benefits:
This asana relieves hunch back, bank pain, lumbago, myalgia of the back. This asana is
useful for ladies in toning their ovaries and uterus. It will relieve amenorrhoea (absence of
menstruation), dysmenorrhoeo (painful or difficult menstruation), leucorrhoea (whites) and
various other utero – ovarine diseases. It keeps up efficient blood circulation in those parts. This
is one of the important asana for asthma, bronchitis and cervical spondilitis.
Note:
Do not raise the body suddenly with a jerk. Try to pull the chest up with the help of the
back muscles rather than allowing weight to fall on the hands. Do not breathe through the
month.
14. SALABHASANA
In Sanskrit salabha “locust”. When this pose is demonstrated, it resembles a locust.
 Hence the name salabhasana.
TECHNIQUE:
1. Lie on the ground face downwards.
2. Keep the hands underneath the belly and the fingers should be closed.
3. Keep the chin on the floor.
4. Keep both legs fully extended and straight.
5. Sfitten the whole body and raise both the legs in the air.
6. Lift up the legs, thighs and lower portion of the abdomen as shown in the picture.
Breathing:
Breathing should be normal in the final position. Should not hold the breath. In the
beginning stage the practitioner will automatically hold the breath without their knowledge.
Doesn’t matter/ by regular practice they can keep the position in normal breathing. Deep
breathing must be taken after relaxing this asana.
Timings:
This asana can be done for 10 to 20 seconds according to the practitioner’s capacity. 2 or
3 times can be done.
Benefits:
Doing salabhasana 3 times is equivalent to a one and half km walk.
Salabhasana develops the lower half of the body and the lower extremities also. It tones
the muscles of the abdomen, thigh and legs. It relieves constipation. It tones the abdominal
organs viz. liver, pancreas, kidneys etc., it cures sluggishness of liver and hunch back, and the
lumbosacral are toned up.
15. DHANURASANA
Dhanu means a “bow”. When this asana is performed it represents the appearance of a
bow. The stretched arms and fore arms form the string of the bow.
TECHNIQUE:
1. Lie on your chest with the face downwards.
 2. Keep the arms by the sides.
3. Gently fold the legs at the back. Raise your hands backwards.
4. Catch hold of the ankles with hands.
5. Raise the chest and head extend the chest.
6. Keep the arms and forearm quite straight and stiff.
7. Lift up the head and pull it as far back as possible. Do not rest either the ribs or the pelvic
bones on the floor.
8. Only the abdomen bears the weight of the body on the floor.
9. While raising the legs do not join them at the knees, for then the legs will not be lifted
high enough.
Breathing:
Breathing should be normal in the final position. Should not hold the breath.
Timings:
This asana can be done for 10 to 20 seconds according to the practitioner’s capacity. 2 or
3 times can be done.
Benefits:
This asana gives a good massage to the abdominal region. This is useful in chronic
constipation, dyspepsia and sluggishness of liver. It removes hunch back, rheumatism of legs,
knee joints and hands. It keeps the spine elastic. It prevents premature ossification of bones.
Persons suffering from slipped discs have obtained relief by the regular practice of
Dhanurasana. Cures asthma and diabetes. It also prevents fat from forming around the stomach
and hips. This asana stimulates the endocrine gland and is excellent for women suffering from
irregular or faulty menstruation.
16. VAJRASANA
 TECHNIQUE:
1. Kneel on the floor.
2. Keep the kneels together and spread the feet.
3. Rest the buttocks on the body of the feet.
4. Keep the toes pointing back and touching the floor.
5. Keep the wrists on the knees, palms facing down.
6. Stretch the back erect.
7. Keep the eyes closed and relax the body and the mind.
Breathing:
Breathing should be normal in the final position. Deep breathing can be taken.
Timings:
One to two minutes can be done, according to the practitioner’s capacity.
Benefits:
This asana cures varicose veins, rheumatic pains in the knees and gout, and is also good
for flat feet. Those suffering from pain in the heels or growth of calcaneal sprus they will get
relief and the spurs will gradually disappear.
Note:
In this asana Pranayama, Nadisuddhi, Meditation also can be practiced. Those who
cannot perform padmasana for pranayam, meditation purposes they can perform vajrasana.
This pose can even be done immediately after food and will relieve heaviness in the
stomach.
17. MAYURASANA
In Sanskrit, mayur means a peacock when this asana is exhibited, it feathers at this back.
Hence the name.
TECHNIQUE:
1. Kneel on the floor with knees slightly apart.
2. Bend forward, invert the palms and place them on the floor. The little fingers should

3. Bend the elbows and keep the forearms together. Rest the diaphragm on the elbows and
the chest on the back of the upper arms.
4. Stretch the legs straight one by one and keep them together stiff.
5. Bear the body weight on the wrists and hands. Raise the legs from the floor (either one by
one or together) and at the same time stretch the trunk and head forward.
6. Keep the whole body parallel to the floor with the legs stretched out and the feet together.
Breathing:
Breathing should be normal in the final position in the beginning stage retain the breath
when you raise the body.
Timings:
This asana can be done for 10 to 20 seconds according to the practitioner’s capacity. Only
one time is enough.
Benefits:
It increases the digestive power. It cures dyspepsia and diseases of stomach like chronic
gastritis and reduces splenic and liver enlargement by increasing the intra – abdominal of toxins
due to faulty eating habits. Cures diabetes, kill toxins in the body. This asana strengthens the
forearms, wrists and elbows.
Precautions:
This is a very difficult asana and should therefore be practiced with great care.
18. USHTRASANA
“Ushtra” means a camel. In this asana almost all the limbs of the body are arched like
those of a camel. So it is called ushtrasana.
TECHNIQUE:
Stage 1:
1. Kneel on the floor, keeping the thigns and feet together, and toes pointing back and
resting on the floor.
2. Rest the buttocks on the body of the feet. i.e., do vajrasana.
3. Keep the both hands on the floor at the back side.
4. Maintain some gap between the two hands.
5. Raise the hip portion with help of the hands.
6. Keep the head down at the back side.
Stage 2:
1. Kneel on the floor, keeping the thighs and feet separate, toes pointing back and
resting on the floor.
2. Place the right palm over the right heel and the left palm by making curve at the
 spine back.
3. Press the feet with the palms, thrown the head back and push the spine towards the
thigns, which should be kept perpendicular to the floor.
Breathing:
5 to 10 times deep breathings can be taken in the final position. Should not retain the
breath.
Timings:
This asana can be done for 10 to 20 seconds according to the practitioner’s capacity. 2 or
3 times can be done.
Benefits:
People with drooping shoulders and hunched backs will benefit by this asana. This asana
expands the chest, improves the breathing capacity of the lungs. Cures asthma by inducing the
adrenalin. This asana is a very good asana for the respiratory disorders.
Note:
After finishing this asana, release the hands one by one and rest the hands on the knees
and sit in vajrasana.
Beginners can practice the stage -I for 10 days. After getting flexible spine they can
practice the stage –II. Anyone stage can be practice. Need not do the both stages at a time.
19. MANA MUDRASANA
TECHNIQUE:
1. Sit in vajrasana.
2. Keep the back straight and the both legs should be flat.
3. Hold the left hand by the right hand at the back side.
4. Slowly bend forward.
5. The forehead should touch the floor.
6. The chest and the stomach should lie on the thighs.
Breathing:
Breathings should be normal. Should not hold the breath. After relaxing this asana deep
breathing can be taken.
Timings:
20 seconds can be done. 2 or 3 times can be done according to the practitioner’s capacity.
Benefits:
This pose cures rheumatic pains in the knees and gout, and is also good for flat feet.
Relieves back pain.
In our life we have no chance to fold the body like this asana.
It is also a complementary asana for ushtrasana.
20. ARDHA - MATSYENDRASANA
Ardha means half. Matsyendra was one of a great yogi and he was one of the founders of
hathavidya.
TECHNIQUE:
1. Sit on the floor, with the legs stretched in front.
2. Bend the left leg at the knee and place the left foot on the right thigh joint with the help of
both the hands.
 3. Bend the right leg at the knee and place the heel in close touch with the soft portion of
perineum (space between the anus and the scrotum in the male or the vulva in the
female).
4. Keep the left foot to rest on the ground by the external side of the right thigh close to the
hip joint.
5. Pass the right hand over the left knee by rotating the whole trunk to the left, till the right
shoulder and the left knee stand pressing against each other.
6. Place the right arm – pit over the top of the vertically bent left knee and the right hand
should hold the right knee.
7. Catch hold of the left foot family with the left hand.
8. Twist and turn the spine slowly and steadily to the left.
9. Turn the neck also to the left side so that the chin is in a line with the left shoulder.
10. Keep the chest erect and forward.
Breathing:
Breathing should be normal in the final position. Should not hold the breath. After
finishing this asana deep breathing can be taken.
Timings:
This asana can be done for 10 to 20 seconds according to the practitioner’s capacity. Only
one time is enough.
Benefits:
The liver and the spleen are contracted and so they are toned and cease to be sluggish.
The muscles of the neck gain power. By the practice of this asana, splitting back aches,
lumbago and pains in the hips disappear rapidly. Sprains in the shoulder and displacement of
the shoulder joints are relieved and the shoulder movements become free.
The prostate and bladder are not enlarged if one practices regularly. Since this is a spiral
twisting asana, it has a great curative value and corrects spinal deformities.
Note:
Repeat the same process, twisting the spine on the right side by changing the limbs, thus
accomplishing the twist on both sides. This will complete the pose.
21. ARDHA – SIRASASANA
Ardha means “half”. “Saras” means the head. This asana is the half head stand. Hence the
name.
TECHNIQUE:
1. Spread a blanket fourfold on the floor and kneel near it.
2. Rest the fore arms on the centre of the blanket. The distance between the elbows on the
floor is wider than the shoulders.
3. Interlock the fingers right up to the finger – tips so that the palms form a cup.
4. Place the sides of the palms near the little fingers on the blanket.
 5. Rest the crown of the head only on the blanket so that the back of the head touches the
palms only the crown of the head should be on the blanket.
6. Do no rest the forehead on the blanket only the crown of the head should be on the
blanket.
7. After securing the head position. Raise the knees from the floor by moving the toes closer
to the head.
8. Keep the body in a triangle shape, only your toes and the hands and the head should be
on the floor.
9. Close the eyes. Relax the body.
Breathing:
Breathing should be normal in the final position. Should not hold the breath. After
finishing this asana deep breathing can be taken.
Timings:
One or two minutes can be done according to the practitioner’s capacity. Only one time is
enough.
Benefits:
This asana gives the 50% benefits of sirasasana.
POINTS TO WATCH:
1.90% of the body weight must be in the both hands. We should give only 10% of the
body weight to the head.
2. Beginners and old people can practice this asana instead of sirasasana.
3. After finishing this asana we should not raise our head immediately. After 30 seconds
only we should open the eyes and we can raise our head. Neck movement should be done at the
end.
22. SIRASASANA
‘Sirsa’ means the head. This is the head stand pose. One of the most important yogic
 asanas and it is called king of the asanas.
TECHNIQUE:
1. After securing the ardha sirasasana, move the toes neared to the head and try to press the
novels on the floor, keeping the back erect.
2. Take a gentle swing from the floor and lift the legs off the ground with bent knees.
3. Take the swing in such a way that both feet leave the floor simultaneously.
4. Move the legs up slowly and steadily.
5. Keep the whole body perpendicular to the floor.
6. Close the eyes and relax the whole body.
Breathing:
Breathing should be normal in the final position. Should not hold the breath.
Timings:
This asana can be done 2 to 3 minutes. Only one time is enough.
Benefits:
In this asana alone, the brain can draw plenty of prana and blood. All disease of the eye,
nose, ear, head, throat, stomach, gentio – urinary system, liver, spleen, lungs, renal colic,
gonorrhea, diabetes, piles, asthma, consumption, syphilis etc., are cured. Wringles and grayness
will disappear.
Many uterine and ovarian diseases are cured. Sterility disappears. Cures asthma, epilepsy,
heart diseases and varicose veins. Improves memory power.
Words will fail to adequately describe its beneficial results and effects.
POINTS TO WATCH:
1.90% of the body weight must be in the both hands. We should give only 10% of the
body weight to the head.
2. Beginners and old people can practice this asana instead of sirasasana.
3. After finishing this asana we should not raise our head immediately. After 30 seconds
only we should open the eyes and we can raise our head. Neck movement should be done at the
end.
23. NINDRA EKA PADHASANA
“Eka” means one. “Padha” means foot. This asana is a standing asana in one foot.
 TECHNIQUE:
1. Stand erect with the feet together, the heels and big toes touching each other.
2. Bend the right leg at the knee and place the right heel at the root of the left thigh.
3. Rest the foot on the left thigh, toes pointing downwards.
4. Raise the arms side ways, in lines with the shoulders, palm facing down. Keep the arms
parallel to the floor.
5. Balance on the left leg.
6. Raise the arms straight over the head and join the palm.
7. Concentrate any one point in front of the eyes. Then only the practitioner can make a
balance easily.
Breathing:
Breathing should be normal in the final position. Should not hold the breath. After
finishing this asana deep breathing can be taken.
Timings:
This asana can be done for 30 seconds to 60 seconds to the practitioner’s capacity. Only
one time is enough for the practice.
Benefits:
This asana tones the leg muscles and gives one a sense of balance. This asana gives
willpower, improves the concentration power and a steady mind.
This asana is a compliment asana for sirasasana.
Note:
Instead of standing on the left leg, right leg also can be practiced by placing the left heel
at the root of the right thigh. Stay for the same length of time on both sides.
24. PIRAI ASANA
“Pirai” means one “arc” of the moon. In this asana the outer shape of the boy is like an
arc of the moon. Hence the name.
TECHNIQUE:
 1. Stand erect with the feet one to two feet apart according to the height of the person.
2. Keep the both palms on the both hips.
3. Push the pelvic region slightly forward.
4. Curve the trunk so that the weight of the body is felt on the thighs and the toes.
5. After getting flexible spine, slowly move the hands downwards and keep the hands at the
ankle.
6. Keep the eyes open.
Breathing:
Breathing should be normal in the final position. Should not hold the breath. After
finishing this asana deep breathing can be taken.
Timings:
This asana can be done for 10 to 20 seconds according to the practitioner’s capacity. 2 or
3 times can be done.
Benefits:
It tones the spine. The back feels strong and full of life. Removes low back pain. It keeps
the body supple.
25. PADHA HASTHASANA
‘Padha’ means the foot. ‘Hastha’ means the hand. In the asana the hands are touching the
foot. Hence the name.
TECHNIQUE:
 1. Stand erect with the feet together the feels and big toes touching each other.
2. Raise the both hands above the head and keep legs at the knees.
3. Slowly bent forward and without bending the legs at the knees.
4. Keep the both hands palms on the floor by the sides of the feet.
5. Move the head down and touch the knees.
6. Keep the legs straight and should and should not bend the knees.
Breathing:
Breathing should be normal in the final position. Should not hold the breath. After
finishing this asana deep breathing can be taken.
Timings:
This asana can be done for 10 to 20 seconds according to the practitioner’s capacity. 2 or
3 times can be done.
Benefits:
The abdominal organs are toned. Persons suffering from gastric troubles will benefit by
practicing this asana. Slipped spinal discs can be adjusted by this asana. Activates the liver,
kidney, spleen and pancreas.
Note:
This asana is a complement asana for pirai asana. At the end of each and every back
bending asana the front bending asana will follow. This is a rule in Yoga practice.
26. TRIKONASANA
“Tri” means three, “kona means the angle. This standing asana is the extended triangle
pose. Hence the name.
TECHNIQUE:
 1. Stand erect with the feet two or three feet wide apart.
2. Stretch the arms to the sides to be in line with the shoulders.
3. Keep the palms facing the ground.
4. Bend slowly to the left and touch the ground behind the left foot with left hand.
5. Bend the neck slightly to the right. It may touch the right shoulder and the eyes should
see the right hand fingers.
6. Stretch the right arm above. The right and the left arms must be perpendicular to the
ground.
7. Stand up again and perform the same movement to be left, and finish the asana.
Breathing:
Breathing should be normal in the final pose. Should not hold the breath. Deep breathing
can be taken after finishing this asana.
Timings:
This asana can be done for 10 to 20 seconds according to the practitioner’s capacity.
Three times can be done on each side.
Benefits:
This asana gives very good lateral movements to the spine. This asana tones the spinal
nerves and the abdominal organs, increases peristalsis of the bowels and invigorates appetite.
Those who suffer from shortening of the legs due to fracture of hip or thigh bone (femur) or the
bones of the leg (tibia of fibula) will be benefitted by this asana. This asana lengthens the legs
and also corrects flat foot.
27. KONASANA
TECHNIQUE:
1. Stand erect with the feet two or three feet wide apart.
2. Stretch the arms to the sides to be in line with the shoulders and keep the palms facing the
ground.
3. Raise the both arms above the head and join the palms.
4. Keep fingers inter lock.
5. Keep the right and left arms to touch the ears.
6. Move the trunk side ways to the right side. Keep the position for some time.
7. Then stand erect. Again move the trunk sideways to the left side. Keep the position for
some time. Then stand erect.
Breathing:
Breathing should be normal in the final pose. Should not hold the breath. Deep breathing
can be taken after finishing this asana.
Timings:
This asana can be done for 10 to 20 seconds according to the practitioner’s capacity. Two
or three times can be done.
Benefits:
The sideways spinal movements will help persons suffering from stiff backs. In this asana
the pelvic region is stretched. One side of the abdomen is extended while the other side is
laterally fixed. This keeps the abdominal muscles and organs in condition and the skin round
the abdomen will not sag but remain healthy
28. CHAKRASANA
It resembles a circle – hence the significant name chakrasana. In fact, it resembles more a
bow than a circle.
TECHNIQUE: 1 (For Beginners)
1. Lie flat on the back on the floor.
2. Bend and raise the knees, then bring the feet nearer until they touch the hips.
3. Keep the soles on the ground and maintain some gap between the two legs.
4. Bend and raise the elbows over the head and place the palms under the shoulders.
5. The distance between the palms should not be wider than the shoulders.
6. The fingers should point towards the feet.

8. Arch the back so that its weight is taken on the palms and the soles.
9. Stretch the arms from the shoulders until the elbows are straightened.
10. In the final position try to touch the both heels with the hands.
TECHNIQUE: 2
1. Stands erect and keep the legs parallel.
2. Raise the hands above the head
3. Slowly bend backwards making a curve of the body.
4. Slowly bend the legs at the knee and touch the ground with the hands.
Breathing:
Breathing should be normal in the final pose. Should not hold the breath. Deep breathing
can be taken after finishing this asana.
Timings:
This asana can be done for 10 to 20 seconds according to the practitioner’s capacity. Two
times can be done.
Benefits:
It tones the spine by stretching it fully and keeps the body alert and supple. The back
feels strong and full of life. He who practices this asana will have perfect control of this body.
He will be agile and nimble.
We can get all the other benefits of Bhujangasana, Salabhasna, and Dhanurasana and
retain beauty of chest even after child birth for women.
29. SAVASANA
“Sava” means a corpse. In this asana the object is to imitate a corpse. Once life has
departed, the body remains still and no movements are possible.
TECHNIQUE:
1. Lie flat on the back full length like a corpse.
2. Keep the hands a little away from the thighs, with the palm up.
3. Close the eyes, if possible place a black cloth folded four times over the eyes.
4. Keep the heels together and the toes apart.
5. To start with breathe deeply. Later the berthing should be fine and slow.
6. Concentrate on deep and fine exhalations in which the nostrils do not feel the warmth of

7. The lower jaw should hang loose and not be clenched. The tongue should not be
disturbed, and even the pupils of the eyes should be kept completely passive.
8. Relax completely and breathe out slowly.
9. Start the relaxation process from the toes. Then proceed to the foot, heels, and ankles,
Calf muscles, Knees, thing muscles, the hip, the abdominal organs, muscles of the back,
chest, heart, arm, forearm, hands, shoulders, neck, face, mouth, lips, tongue, ears, eyes,
forehead, head, and the brain.
10. Don’t sleep, repeat “om, om, om” in the mind.
BREATHING:
Breathing should be normal. But breathe slowly and steadily.
TIMINGS:
Stay in the pose from 10 to 15 minutes according to the practitioner’s time.
BENEFITS:
Relaxation is very important factor in muscular exercises. This removes the fatigue
caused by the other asana and induces calmness of mind. This removes and destroys fatigue,
and quiets the agitation of the mind, steady, smooth, fine and deep breathing without any jerky
movements of the body soothes the nerves and calms the mind. The stresses of modern
civilization are a strain on the nerves for which savasana is the best antidote.
It cures high blood pressure, insomnia and diseases caused by tension.